Creating a 3D Printed Keyring
In this tutorial, we will show how it is possible to create a keyring in a few simple steps using our 3D editor tool. What we will be creating is a circular keyring with a small hole at the top for the keychain to connect to and a raised pattern that can be seen below in the first image.
Our completed keyring 3D model
A 3D printing preview of the keyring
The completed 3D-printed keyring
Step 1 - Add the Raised Image
The first step is to find an image suitable for use. We have selected one of these excellent heightmap images as our main pattern with which to build upon. To add the image to the canvas, click the upload button at the bottom of the toolbar on the left side of the tool. You can then navigate to your heightmap image and add it to the canvas.
Once the image has been added to the canvas, in order to ensure it is converted into 3D space correctly, we need to adjust the settings to inform the tool that the image we are using is a heightmap. We do this by clicking the configuration button to the top-left of the image, which will open the configuration panel.
Within the configuration settings, we set the Mode setting to Standard and the Depth to 10mm. The depth can be adjusted to make the raised area higher or lower, depending on your image and preferences.
The heightmap image added
Setting the Mode to Standard
Step 2 - Add a Secondary Layer
With the image added, we now need to create a new Layer that will be used to create the keyring base. Layers within the 3D editor are similar to layers in popular 2D image editing software and allow 3D elements to be stacked on top of each other. Our keyring will be composed of 2 layers: Layer 1, which contains the raised heightmap image, and Layer 2, which will contain the keyring base and sit under Layer 1.
When creating a new 3D design within the editor, there is a single layer already created for you. In order to add a new layer, we need to click the Layers button in the top toolbar. This will bring up the Layer configuration panel, from where we can add a second layer, and by using the up and down arrow buttons, adjust the layer ordering to ensure the layer containing the image is below the base keyring layer.
The currently active layer is highlighted with a red border, and only items on the active layer can be edited; thus, you will need to switch between layers if you wish to change the properties of the heightmap image or circles.
The layers panel, with a second layer added
Step 3 - Creating the Keyring Base
The base of the keyring is formed by creating two circles: one large circle that will sit under the image we added previously, and another smaller circle that sits at the top and will be where the cut-out for attaching the link chain to.
To get started, we add a circle using the Circle button on the left-side toolbar and click the configuration button to set the radius. For this particular image, we set the radius to 105mm, which may seem large, but we can scale this down when we come to print it. On the configuration panel, the thickness of the base can also be set to 5mm in the Depth field; again, this can be changed and scaled later on as needed.
With the two circles added to the canvas, it is now time to join them together using the Merge command. With the larger circle selected, we click the Merge button, and then select the second, smaller circle to join the two together. Note that once merged together, the combined circles are converted into a generic shape, and thus individual circle properties such as the radius are not available to edit.
The main circle radius is set to 105mm
The second smaller circle added
The two circles combined
Step 4 - Creating the Cut-out
Now it is time to add the cut-out, which is where the key chain will connect to the keyring. For this, we create another circle with a radius of 10mm and position it centrally over the top of the smaller circle previously added, as shown in the image below.
As we want this circle to make a hole in the previously added circle, we set the Rendering mode to Subtract, so instead of adding to the 3D model, this circle will create a hole in the model, as can be seen in the 2nd image below.
A 10mm circle with rendering set to Subtract
Both layers are set to visible
Our completed keyring 3D model
Step 5 - Saving and 3D Printing
With the design in the bag, we now turn our attention to saving the file. When you click the Save button in the top-right of the tool, you will have the option to either Export or Save your design. Saving the design to an ITSP file saves it in a format that allows you to then reload and edit your design in the future. The Export button will save your design in one of the many 3D model formats we currently support. As we are going to be 3D printing the design, we will export the design to the STL format which will ensure it can be opened by our 3D printing slicer software.
The 3D designer save panel
The 3D model is ready to be printed
A 3D printing preview of the keyring
All Done
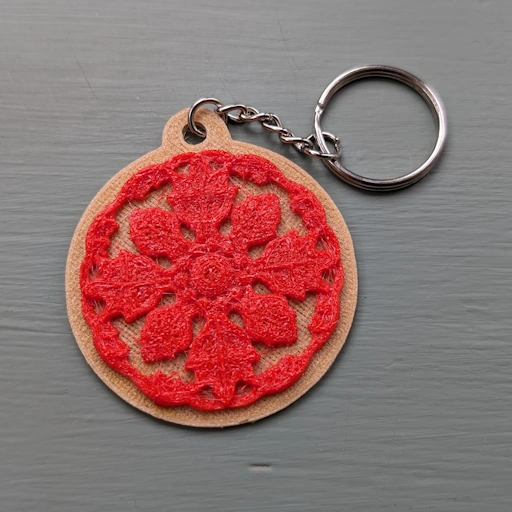
After around 30 minutes in the 3D printer, here is the 3D-printed keyring. This particular 3D printer supports only one color at a time; however, this isn't an issue, as when the printer has completed the base in gold plastic, we can pause the print and swap the plastic for a red colored plastic for the top raised heightmap part of the keyring.
The completed 3D printed keyring
The keyring attachment
The completed 3D printed keyring with attachment

Add a Comment
No Comments
Be the first to comment on this article.