How to 3D Print an OBJ file
Welcome to this 3D printing tutorial, where we will show you how to 3D print an OBJ model file using our conversion tools and the 3D printing software of your choice.
Firstly, you may need to convert your OBJ file into a file format that is recognized by your 3D printing software. Most 3D printing software supports the STL or 3MF formats, so please check with your 3D printing software which format is supported. If you are lucky, it may have support for the OBJ format built in.
The 3D printing software we are going to use is Simplify 3D, which has built-in support for importing STL, 3MF, and OBJ files directly. Most 3D printers come with their own slicing software, which offers similar features, and there are plenty of 3D slicing software out there for free.
In this tutorial, we will assume our software does not support the OBJ format and instead convert it to the STL format first.
Step 1 - Converting OBJ to STL or 3MF
To get us started, we need to convert the OBJ file into a format supported by your 3D printing software. As mentioned previously, STL and 3MF are the two most widely supported formats within 3D printing software.
We use our OBJ to STL convertor tool to perform this conversion. The tool is simple to use; either select the "Upload" button and select your file or drag and drop your OBJ file onto the tool. Once you have selected your OBJ file, you will see your file listed within the tool, ready to be converted. All that you need to do now is click the "Convert" button to receive your converted STL file.
If your 3D printing or slicing software supports the 3MF format, you can use our OBJ to 3MF convertor instead to create a 3MF file from your OBJ.
Step 2 - Loading your 3D Model
With the converted STL or 3MF file in hand, we can now open up our 3D printing software. The software chosen for this tutorial is the excellent Simplify 3D 3D printing application, though there are many other 3D slicing applications out there. Once opened within the 3D printing software, we are presented with a preview of the 3D model on the print bed, ready for any final adjustments prior to printing.
Before we continue, here is a little information about 3D printing and how it works. It is important to understand the different types of 3D printers and their advantages and disadvantages in order to make the best choices within the slicing software.
SLA Printing
Another common 3D printing method - SLA (Stereolithography), uses a laser aimed at a bed of photopolymer resin to create a 3D print layer by layer. Some SLA 3D printers offer superior print quality compared to FDM printers but may suffer from much smaller printable volumes.
SLS Printing
SLS, or Selective Laser Sintering, is a method of 3D printing using a laser and a bed of powder, such as nylon. The laser creates the final 3D print by heating the powder and binding it together to form a solid shape. Due to the strength and high quality of the final 3D printed model, SLS is typically used by commercial 3D printing companies.
FDM Printing
The most common type of 3D printing, FDM (Fused Deposition Modeling), uses the process of heating up plastic filament and squirting it through a small-diameter metal nozzle at high temperatures while drawing the 3D model one layer at a time. The process has many variables, such as layer thickness, wall thickness, infill percentage, and more, that can be tweaked to produce the final 3D print most suitable for the model and its application.
We will be using a MakerBot FDM printer for the purpose of this tutorial. This printer has a large printing area and can print the 3D object using PLA filament plastic.
Step 3 - 3D Printing
The final step in our tutorial is to begin 3D printing your model. Depending on the connection options given by your 3D printer, it may be necessary to connect the printer to your computer via USB. It may also be possible to save the 3D print file (GCODE) to an SD card and insert that directly into the printer. Most modern printers will also support WiFi. To verify how the 3D model will be printed Simplify 3D offers a preview mode showing how the model will be sliced up into layers with a preview layer slider control that allows you to examine how the model will be printed layer-by-layer.
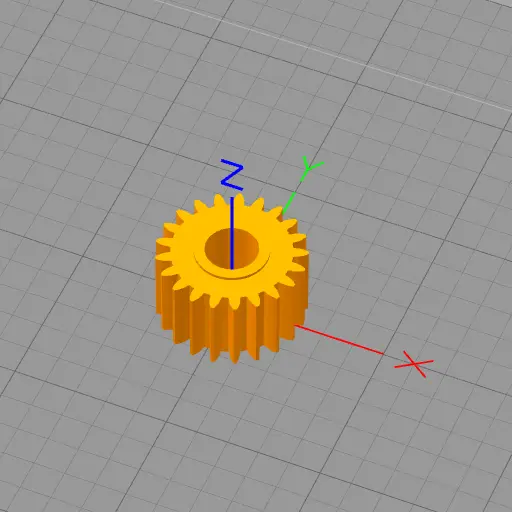
The preview mode is a great way to see how the various configuration options affect the sliced model. The 3D model we are printing is a small cog, which should take no more than 15 minutes to print:
In general, the default settings within your 3D printing software should produce great results for most 3D models; however, some tweaking may be needed if you experience warping or need additional strength in parts of the model.


Add a Comment
No Comments
Be the first to comment on this article.